
Learning Curve Exercise
A level design exercise, created in Unreal Engine 5.
Game Genre and Theme:
This game is a third-person platformer, where the player must overcome different obstacles to reach the magical crystal.
The crystal is hidden in a land above the clouds, and only the most agile and persistent adventurers have what it takes to face the Trial of the Wind.
Do you have what it takes to complete the trial, and gain the powers of the magical crystal?
Objective:
The objective of this test is to show some of my process while designing a new level. To do so, I programmed some basic mechanics, and used a few asset packs from Unreal Engine for the visuals and movement of the character.
From the mechanics I created, the goal is to show how I would approach to use them in a level. The character can move around and jump. I created 4 different types of obstacles that the player must face. With the obstacles for the game defined, I made a checklist that I used to create the level for the game. Firstly I will provide with an overview of the list, and secondly I will analyse each one of these phases in more detail, to explain my decision and design process.
Level Design Process
First: Define game mechanics and their respective atomic parameters, followed by creating said mechanics.
Second: Define player values, the difficulty evaluation method to use, and finally define difficulties for each obstacle by changing the values of their atomic parameters.
Third: Define a desired low-detail difficulty “curve”, to create a good game flow, and project the overall scope of the level.
Fourth: Define obstacle set order and how many are needed.
Fifth: Sketch some full-level block-out ideas, and Define the difficulty for each obstacle set to match our difficulty curve and player flow.
Sixth: Build level based on previous sketches and defined information.
Seventh: Test the level, compare the results with the target difficulty, player flow, and level duration, iterate on the level, and repeat testing until the values match the desired objectives.
First Step: Define game mechanics and their respective atomic parameters, followed by creating said mechanics.
I created the game mechanics based on an Unreal Engine course I'm currently taking. By doing so I got familiar with programming in C++, and by constraining myself with this game mechanics, I could focus on the goal of this exercise, which is creating challenges to introduce mechanics to the players and create variety within the constraints previously set.
To define the atomic parameters I chose two that I think were more relevant to the context of the game. However, the presented atomic parameters are not exclusive, and more could be taken into consideration.
Player Mechanics:
Movement - [WASD]
Description: The player can run around using the WASD keys.
Atomic Parameters:
- Run Speed;
Jump - [SPACEBAR]
Description: The player can jump using the SPACEBAR.
Atomic Parameters:
- Jump distance and height;
- Air Control Percentage;
Obstacle Mechanics:
Cube Pusher
Description: A cube that travels horizontally and pushes the player.
Atomic Parameters:
- Effective Distance;
- Cube Speed;
Moving Platform
Description: A platform that travels horizontally and vertically, used to transport the player
Atomic Parameters:
- Platform Area;
- Platform Speed;
Rotating Platform
Description: A platform that rotates 360º and moves the player when he steps on it.
Atomic Parameters:
- Rotation Speed;
Sweeper
Description: An obstacle that rotates 360º and pushes the player.
Atomic Parameters:
- Rotation Speed;
Second Step: Define player values, the difficulty evaluation method to use, and finally define difficulties for each obstacle by changing the values of their atomic parameters.
To define the player values, I tried different combinations and chose the values that felt more natural. In future playtest sessions these values can be easily changed according to player feedback.
As I had defined already the atomic parameters that would be used to adjust the difficulty, what was missing was what method would we use to define difficulty. In the end, I decided by adopting a three-tier difficulty method (Easy, Medium, Hard) for the player mechanics as they were at the core of the game, and there was no need in having more tiers as jumps could be adapted to other more complex mechanics.
However, I chose a five-tier difficulty method (Easy, Easy-Medium, Medium, Medium-Hard, Hard) for the obstacle mechanics, as having more tiers meant that obstacle difficulty could be more easily adjustable to match the difficulty curve, that I'll show later on.
To represent each of these divisions I used a method where the hardest challenge would require the most mechanical skill from the player (100%), while the easiest obstacles would require 55% or less of the maximum mechanical skill. This can be seen in the yellow table below.
To calculate the specific difficulty values, I tested and noted the result corresponding to the max mechanical skill to the hardest difficulty, and through that calculated the other difficulties. For example, The maximum distance a player can jump is 9 meters and this corresponds to the hardest difficulty interval (100%). To calculate the easiest jump I would do '0.55 x 9 = 4.95' and by doing so get the minimum value. All the difficulties are represented by a range of values rather than a specific value, to guarantee adaptability for each challenge.
Below there are four tables representing every value for every game mechanic difficulty, as discussed above.


Third Step: Define a desired low-detail difficulty “curve”, to create a good game flow, and project the overall scope of the level.
Difficulty Curve:
The difficulty curve is a very important part of the process. Having a good, well-defined difficulty curve allows for the player flow to be balanced, and maximizes engagement. From a general point of view, if obstacles are too easy, the player will get bored and stop to play. However, if the game is too hard, the player will get frustrated and stop to play. The idea is to throughout the level, maintain the player in this flow so that he will be engaged the entire time.
The boredom and frustration of a player are great ways to measure the flow and engagement in the game, but the difficulty is not the only factor that contributes to this. If we repeat the same obstacles in the same way over and over again, the player will get bored and or frustrated and stop to play. On the other hand, if we change constantly the obstacles the player will get frustrated, because he is not being able to use the tools he had learned with previous obstacles, and he is in a constant state of adapting and learning without the reward of using this knowledge to progress. So again, a balance between this has to be achieved. Combining existing mechanics and combining different atomic parameter values are great ways of maintaining the gameplay fresh, while also reusing a lot of the same resources. This is great because it costs the team less development, and the player gets the variety he needs to be engaged in the level.
Before creating my difficulty curve, let's analyse one of the many examples and curves possible.

Credit to David Strachan, http://www.davetech.co.uk/difficultycurves
The idea behind this curve is to increase the difficulty constantly and decrease it when a new mechanic is introduced. This gives the player a moment to breathe after engaging in a difficult task. The idea for the curve I'm proposing to test is based on this difficulty “saw”. In the curve I’ll use for this level, the difficulty increases exponentially during each obstacle set, to give the player the feeling of “easy to learn hard to master”, followed by a slightly easier obstacle, that will give the player a less steep decrease, and will make him feel ‘clever’ for being able to complete a “hard puzzle” with ease, (even though he just complete a more difficult one before) before we introduce a new mechanic and repeat the cycle.
This is the curve I will use for each obstacle set:

-
In the green marker is the introduction of the mechanic. From this point to the yellow marker the goal is to teach the player this new mechanic and familiarize him with it.
-
In the yellow marker, the obstacles stop teaching the player and start to challenge him. This is where the player will spend most of the time, and will face a few obstacles progressively harder.
-
In the red marker, the player will face the climax of the obstacle set, which shows the hardest challenge faced yet.
-
The orange marker is a small cooldown. After the player faced a very hard challenge, the next challenge will be
slightly easier, this will make the player feel smart and will soften the descent to a new game mechanic.
-
In the last green marker, we introduce a new game mechanic or junction of game mechanics and we repeat the cycle.
Level Scope:
For the scope of my level, I want to keep it relatively short, but with a substantial time between new game mechanics, so the player doesn't feel overwhelmed.
The aim is for a total time of 10 minutes, with a max of 6 obstacle sets. Each obstacle set must introduce a new mechanic and/or repeat previously learned mechanics and/or new combinations of mechanics.
Fourth Step: Define obstacle set order and how many are needed.
First, we are going to need one obstacle set for each mechanic the player needs to learn.
So in the minimum, we will need 5 obstacle sets:
-
One: Teach jump.
-
Two: Teach moving platforms.
-
Three: Teach cube pushers.
-
Four: Teach rotating platforms.
-
Five: Teach sweepers.
For this exercise, I will only create the 5 obstacle sets needed to introduce the mechanics. However, in the future, more levels can be created by iterating and combining different game mechanics and difficulties. I will also create a specific order for the obstacle sets. This could be iterated in the future, but for now, I will pre-define an order and justify my decision. The order I chose was the following:
-
Teach to jump
-
Teach cube pushers
-
Teach moving platforms
-
Teach rotating platforms.
-
Teach sweepers.
Reasoning:
First: Jump. The only player mechanic other than basic movement is the jump. So it needs to be the first thing the player learns.
Second: Cube Pushers. Cube pushers are important being next because they teach the player two important lessons, namely that obstacles can push the player and require timing to overcome. With this by the second obstacle set, the player already knows how the world interacts with him, and that is a very valuable lesson.
Third: Moving Platforms. Moving Platforms make a lot of sense being third because they combine the two things the player has learned previously. Jumping, and timing. With moving platforms, the player will use these two teachings to overcome the next obstacle.
Fourth: Rotating platforms. Rotating platforms are next, because now that the player learned about jumping, timing, and using these mechanics together we can introduce a new variable. In this case, platforms can also rotate. here we introduce a new mechanic, creating variety, and we can also incorporate previous mechanics here.
Fifth: Sweepers. Sweepers make sense being last because they apply almost every lesson the player has previously learned. Objects can push the player, they require timing to overcome and can also rotate. With this, the player can use all of the previous knowledge to overcome the goal.
Fifth Step: Sketch some full-level block-out ideas, and define the difficulty for each obstacle set to match our difficulty curve and player flow.
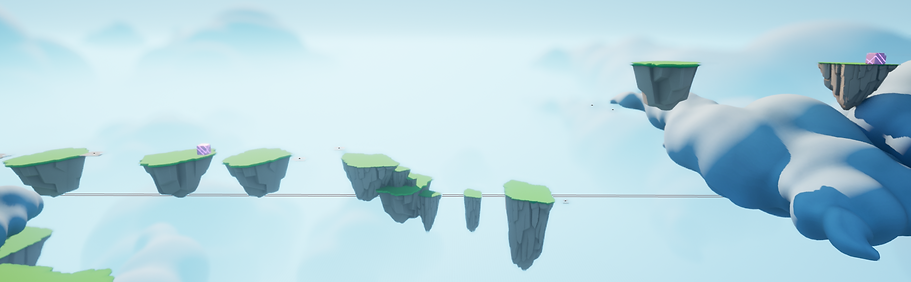
First Obstacle Set: Jumps

Second Obstacle Set: Cube Pushers

Third Obstacle Set: Moving Platforms

Fourth Obstacle Set: Rotating Platforms

Fifth Obstacle Set: Sweepers

Sixth Step: Build level based on previous sketches and defined information.
First Obstacle Set: Jumps

Second Obstacle Set: Cube Pushers

Third Obstacle Set: Moving Platforms
Fourth Obstacle Set: Rotating Platforms

Fifth Obstacle Set: Sweepers

Seventh Step: Test the level, compare the results with the target difficulty, player flow, and level duration, iterate on the level, and repeat testing until the values match the desired objectives.
Currently, I haven't tested with players my level enough to validate the proposed values. However, with some internal testing, I know that some obstacles in the third and fifth steps need to be addressed, as they are too difficult at the time they appear in the level, and are breaking the player flow. This change will be the first to be addressed.
After more test sessions, I will update this section, to document my findings, what changes need to be implemented, why and how my projected curve compares to reality.